
Computers have grown a lot better at generating meaningful error messages over time. However, because of the intricacy of contemporary software, you may need a degree to comprehend what you’re being taught. We’ll discuss what the most frequent Java Virtual Machine errors signify and how to fix the underlying problems in this post.
What Is A Virtual Machine?
A virtual machine, in layman’s terms, allows your computer to imitate a whole different system. This allows you to execute programmes that would otherwise be incompatible with your system architecture, such as Android applications on a Windows computer. So, how does all of this relate to Java? First before program is interpreted, a Java file is run via a version of the Java Virtual Machine. This implies that if the virtual machine has an issue, you won’t be capable of running Java apps until the issue is fixed.
JVM Launcher Could Not Find The Main Class:
This appears to be a major problem, but it’s actually one of the simplest to correct. If you are just seeing this, it’s likely that something went wrong with your Java installation. You only need to reinstall it. To do so, follow these steps:
- Remove the prior Java installation. This is done under the Programs and Features submenu of the Control Panel for java virtual machine launcher a java exception has occurred windows 10.
- Then go to the Java website and choose the appropriate version for your os.
- Try executing the Java file again after restarting your pc.
The JVM could not be created:
Here’s yet another example of a cryptic error notice that does little to assist you. The great news is that this issue generally has a single cause: Java is attempting to consume more RAM than your system has available. So, what’s the solution?
- To proceed, go to the Control Panel.
- Select System, Advanced Capabilities Properties, and Environment Variables from the drop-down menu.
- Select “Add” from the drop-down menu.
- Remove the quotation marks from the New Variable Name and replace it with “_JAVA OPTIONS.”
- Without the quote marks, change the value to “-Xmx512M”. The numbers before the M denote the max number of RAM available to Java. You might also use “-Xmx1024M” or “-Xmx256M,” for example.
What Causes The java virtual machine launcher a java exception has occurred?
This might help prevent the problem from happening again.
-
Administrator Access Issues:
If you try to launch a Java software like Minecraft and you’ve not enabled Java to run as an admin, you’ll see this error. In this scenario, the repair is typically fairly simple. All you have to do now is launch Java as an administrator, and your Java programmes should start working correctly again without the issue.
-
Problems With Your Java Installation:
Because the Java Virtual Machine is being used to run Java programmes, errors like the “Java virtual machine launcher error” might occur if there are problems with its installation. The solution is also simple. All you have to do now is reinstall it. To reduce the possibilities of the problem happening, always download Java apps from their official sources.
-
Issues with Allocated RAM:
Errors might occur when the Java Virtual Machine requires more RAM than it currently has. It’s also simple to fix. You have the option of increasing the allotment. Also, keep your system free of junk to avoid slowing it down or causing issues. These are simply the most common causes; errors can also happen accidentally.
How to solve Java Virtual Machine Launcher Error
1. Using Administrator Access To Run Java:
The first step is to open Cortana by pressing (Windows + Q) on your keyboard. To find Java, type it into the search box. By typing Java and pressing Enter, you may do this. Right-click on Java when the search results appear to provide various choices. Search for and choose Open File Location from the list of possibilities that appears.
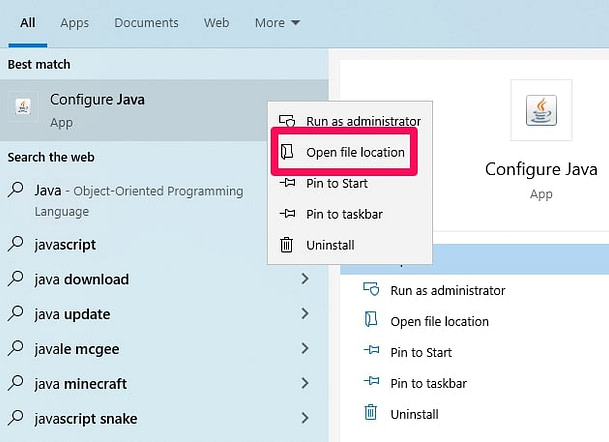
This will open Java’s file in your File Explorer right away. The Java.exe file will be visible. Right-click on that file as well, then select Properties from the drop-down menu. You’ll be directed to a menu with several tabs.
Look for the Compliance tab and click it. Go over to the Compatibility tab’s Settings section and check the box towards the left of the Running This Programme As An Administrator choice in that area.

After you’ve ticked the box, scroll down and click Submit to be sure the adjustments you made will take effect. Then, to verify all of the modifications, click OK, and then exit the menu. This might resolve the “Java virtual machine launcher error,” and your Java apps should resume regular operation without any problems.
2. Uninstalling And Reinstalling:
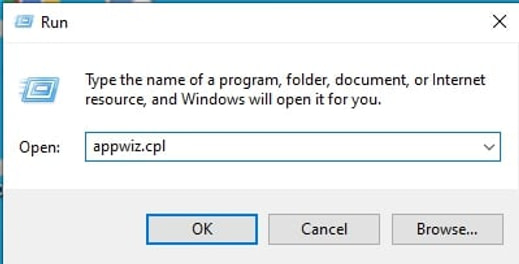
You’ll need to utilise the Run window first. Using the shortcuts (Windows + R), open the Run window. Insert appwiz.cpl into the Run box and press Enter.
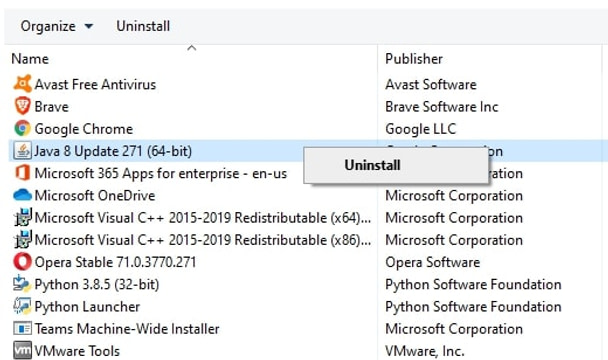
- The Uninstall Or Change A Program option will appear after that. You may remove Java from this location.
- You may look for Java using the menu’s search box or by scrolling down.
- Once you’ve located it, click on it. The option to uninstall should now present. Select Uninstall from the drop-down menu.
Reinstalling:
- If you doesn’t have all the official Java download links, click here.
- The download page should display when you click the link ahead.
- If you are unsure which option you require, you should download both.
- If you are using both 32-bit and 64-bit Java websites, you can download both variants.
- Don’t forget to download the Offline version.
- When you’ve finished downloading the file, launch it and follow the on-screen instructions to install it (the Java setup wizard).
- After you’ve finished, your Java apps should operate normally again, without the “Java virtual machine launcher problem.”
3. Setting Up A New System Variable In Java:
You’ll need to utilise the Run window first. When using keyboard shortcuts (Windows + R), launch the Run window. Enter the command :”sysdm.cpl” through into Run window and press Enter.
The System Properties menu should appear as a result of this. There are quite a few tabs in the System Properties menu. To access the Advanced tab’s menu, find it and clicking on it.
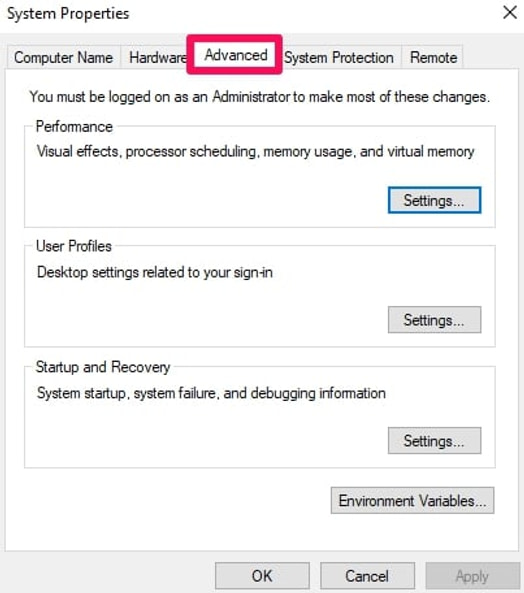
- Go to the Settings option and choose the Environment Variables… option.
- When a menu appears, it will be divided into two pieces. Continue to the next section (System Variables).
- In that area, choose the New option. A new system variable will be required of you. To guarantee that this advice works for you, follow the instructions carefully.
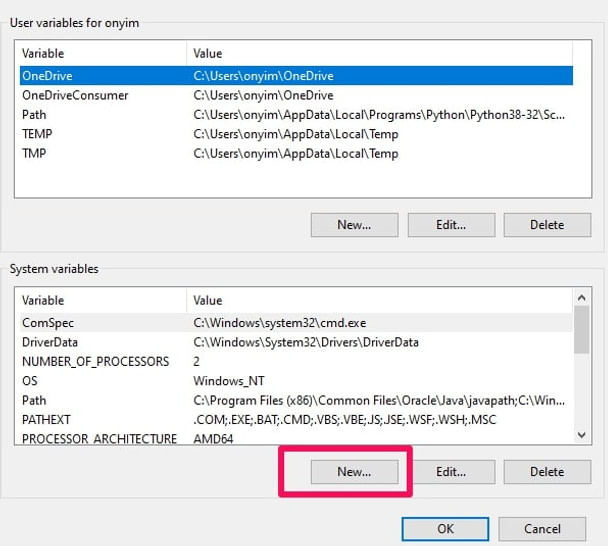
Variable Name – _JAVA_OPTIONS
Variable Value – –Xmx512M
The above-mentioned new system variable raises Java’s allotted RAM to 512 MB.
This should be sufficient to guarantee that it functions properly and that the “Java virtual machine launchers error” does not occur.
Conclusion:
The three suggestions above should be used, and one of them will assist you in permanently eliminating the mistake. You may also utilise the reasons guide to take preventative measures even before the issue arises.
Visit, VECTOR MARKETING.